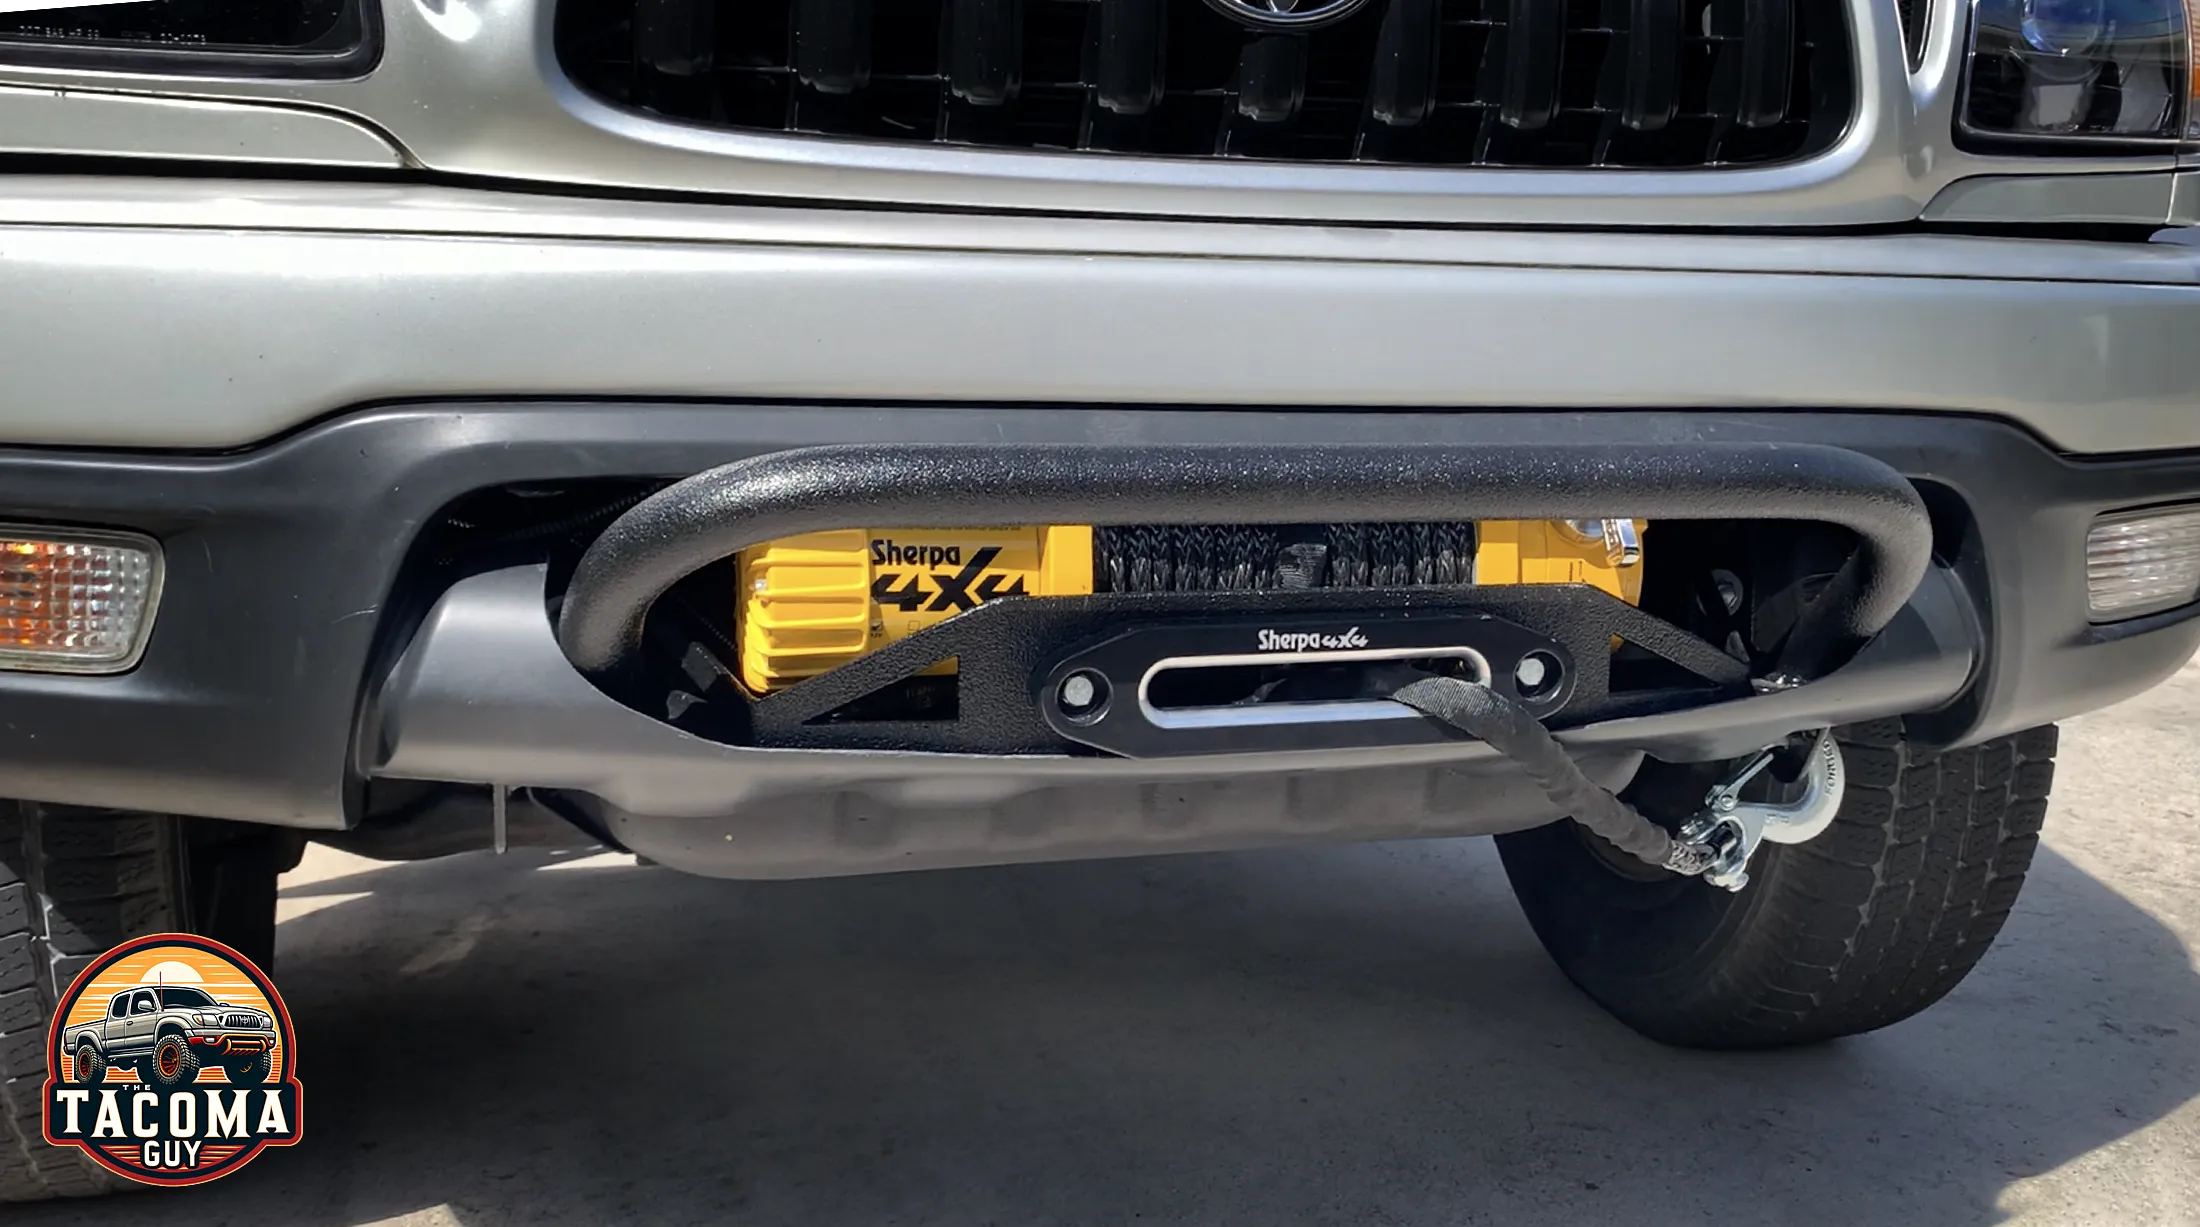
This guide will show you how we installed a Sherpa Mustang 9,500 lb Winch on an Amp’d-Up Fabrication bracket onto our 2003 Toyota Tacoma PreRunner.
Ampdupllc.com They make all kinds of custom bumpers, brackets, you name it. Small shop so you can work directly with the owner if you want too.
Sherpa4x4.com Australian manufacturer of incredible winches. Bomb-proof product with quick delivery times from AU.
This guide will help you get the general idea of what installing a winch looks like on a truck, so even if you have a Jeep or are using a different winch altogether, the process is pretty much the same.
The install isn’t complicated, but it is a little time consuming. You will need to make some fabrications to your trucks OEM bumper the way we did if you want to keep a stock look (that’s why we went with the Amp’d Up bracket by the way, to keep the OEM bumper.) Most of that customization is in the lower bumper is with the lower air valence, which can easily be separated from the bumper and which you can pickup on eBay for around $80 if you mess yours up too badly.
IMPORTANT NOTE: There is one important decision you need to make, and that is deciding where to install the control box. Some winches already have a box attached to the top of the winch, and you run power and ground to it. The Sherpa winch we have has a separate control box which wouldn’t fit under the bumper nor would it give us access to the plug for the controller box so we installed it in the engine bay – however this required disassembling the controller box and replacing the power and ground cables with longer cables. Not difficult to do, but it might void your warranty.
ANOTHER NOTE: I had to rotate the clutch plate on the Sherpa Winch to be able to access the clutch lever from the front of the truck. Sherpa provides instructions and a video on their website on how to do that. It’s not complicated.
There are a number of reasons to install a winch: it can help you get your stuck truck out of a bind, or someone else’s vehicle, or you can use it to pull things if you need to, like pull a heavy log out of a roadway. It’s a great investment for a truck, and a must have accessory for 4WD off-road enthusiasts.
Affiliate notice: The Tacoma Guy is an Amazon and eBay Affiliate. That means we get a small percentage from them if you use the links to purchase the product. It doesn’t increase your cost! If you found this tutorial helpful, please consider using these links to help support this mom & pop business, thank you! Learn more.
Tools Required:
- Metric Socket and Wrench Set: you’ll need deep sockets and regular sockets, 10, 12, 17mm.
- Power Drill: any drill will do, cordless or otherwise
- Cutting Fluid: I used the Tap Magic ProTap cutting oil when drilling though metal parts.
- Powered Multi-Tool: We used a corded Dremel Multi-Tool, but there are many kinds available to cut the plastic on the lower valence of the bumper.
- Cutting Wheel / Grinder: theres part of the metal bumper you need to cut away.
- Dremel Rotary Tool: for cutting the plastic lower air valence on the bumper.
- Dremel Grinding Stone Heads: I used mostly the column and T heads when cutting the lower valance.
- Cable Stripping Knife: I got this one from Jokari for $21.
- TEMCo Hydraulic Electrical Cable Lug/Terminal Crimper Kit: If you are planning to extend the control module, you’ll need something to crimp the 8mm ring terminals onto the cable. This kit is an AWG kit (thats for US sizes) and you’ll be working in metric – so you’ll have to crimp 2x to get a strong crimp. See description about that below. There are other cheaper types of crimping tools out there, I wanted this heavy duty one for other projects, so I splurged on it.
- Klein Tools Cable Cutter: you’ll need a big cable cutter to get through the 25mm power and ground cables to rewire and reposition your control module like we did.
- Crimping Tool Set: this is for the smaller cables you might need to crimp, like the 16 ga ground cable from the control module.
- Century Drill & Tool T-Handle Tap Wrench, 1/4″ – 1/2″: need this for the tap below.
- Drill America – POUM8X1.25 m8 x 1.25 Tap and 6.75mm Drill Bit Kit: to drill and tap the holes for the lower skid plate to hang onto the Amp’d Up Bracket.
- Blue Loctite: To secure the winch bolts, and any other screws or bolts you might be using to secure the control module.
Parts Required:
- Metal Mounting Bracket kit, Transmission Oil Cooler Mounting Kit: I used 2 sets of these kits to mount the control box of the winch inside the engine bay. Watch the video to see how I did that. I also used some of the cable brackets to hold up the power cable from the control module to the battery.
- 25MM Welding Cable in Red and Black: If you want to extend the cables of the control module so it can be relocated in the engine bay you will need 4 meters of red 25mm cable and 4 meters of black 25mm cable.
- uxcell 7 Pcs SC25-8 Cable Copper Lug Terminal Connector for 8mm: use these to terminate the ends of the 25mm power and ground cables if you are extending the ones from the control box to the winch.
- InstallGear 4 Gauge AWG Tinned Pure Copper Lugs Ring Terminals: I needed 2 of these for the connectors on either side of the Sherpa Battery Isolation switch (not required, but advisable) however these were a little too small, I had to enlarge the hole slightly. You might want to find another option if you plan on installing the Iso switch.
- Heat Shrink Tubing: Cover the ring terminals where they connect to the cable to prevent shorts and water entry. You’ll need a heat source, like a heat gun or blow torch.
- Electrical Wire 16 AWG 16 Gauge Silicone Wire Hook Up Wire Cable 20 Feet: To extend the small ground cable between the control module and the winch.
- Qibaok 1500pcs Wire Connectors Insulated Electrical Wire Terminals: You’ll need 2 different sizes if you are extending the small 16 ga ground wire between the control module and the winch. forgot which sizes I used, but I needed a full kit like this anyway for other projects.
- 1/2 inch Split Wire Loom Tubing Wire Conduit: I wrapped all the cabling between the control module and the battery / winch with loom in order to protect them from cuts and from shorting out. Lots of these cables are rubbing against metal as it sits in the engine bay, you’ll want to be careful, get the loom. It’s cheap and worthy.
Video Walk-Through:
Check out our step-by-step video tutorial first to get an idea of the process, then you can read the guide below and print it out if you want.
Step-by-Step Guide:
Coating / Painting the Amp’d Up Bracket
The bracket and front bar that came to us from Amp’d up was raw steel, which you will need to paint or coat in some way to keep it from rusting on you. At first I tried some primer and Rustoleum Undercoating spray, but it wouldn’t stay on properly so I went to my local Line-X shop and had them coat it for me (along with adding an undercoat to the truck at the same time. It all came out much better this way. You do what is best for you.
Removing the Bumper
You’re going to be doing this several times – removing and installing the bumper. Firstly becuase you probably wont get the whole install done in a day (so instead of driving around with no bumper we would put it back) and secondly once you start testing the fitting of the new rack and determining where you need to make cuts.
- Remove the lower bumper blinker lights by twisting the housing and pulling them out. Do this on both sides first so you don’t accidentally try to pull the bumper off with these on, and pull or damage the cable that connects them.
- There are 3 bolts (6 total) on either side you need to remove. 2 located just above the bumper turn signal light on a bracket. The other is behind the plastic wheel well cover above the tire. There is a hole there where you can access the bolt. I believe all 6 require a 10mm socket.
- There are 2 plastic tabs which hold the bottom of the bumper onto the bumper reinforcement arms. You can cut these off, or use a screwdriver or pry tool to release them. You wont need them once your bracket is on, all they will do is hang there.
- Now carefully pull the bumper straight off the truck. You might need to pull one side out then the other to wiggle it off.
Installing the Bracket
- If you are installing the Amp’d up bracket as we did, you’ll need to remove some bumper parts. The front bumper reinforcement bar has 2 bolts holding it on. I think they are 17mm or so. You are going to need a deep socket and/or socket extension arm to reach in there. You can put this bar aside, you wont need it any more.
- There are two skid plates (bottom engine cover plates if you will) and the one in the front is attached by 3 bolts to a cross member bar we are going to remove permanently, and by 2 bolts in the back (look for the holes) which will require a socket extension arm to reach.
- The cross member bar is held on by two 17mm bolts. Removal of these will also require a socket extension, and probably a breaker bar to loosen. Once this is off you can put aside, you won’t be using this bar again but hold onto the bolts, you will need them for the Amp’d Up bracket.
- With your 17mm socket, remove the four bolts (two on either side) which hold in the tow hook and the stabilization hooks (installed at the factory to secure the truck while shipping to dealership.) You can put these brackets aside, you wont be using them anymore, but hold onto the bolts for the bracket.
- Now you can install the Amp’d Up (temporarily) so you can mark the holes where you will need to drill new holes for the front skid plate into it – Amp’d Up does not precut these holes, so you will need to drill and tap them yourself. Hang the front skid plate on the Amp’d Up bracket (there are hooks that will hold it up) and install the back bolts to hold up the skid plate. Now make marks where the bolt holes should go. Then remove the skid plate, remove the Amp’d Up bracket and take it to your workbench.
- Now you are going to drill and tap the holes for your front skid plate. You’ll need a POUM8X1.25 m8 x 1.25 Tap and 6.75mm Drill Bit and some cutting oil (Tap Magic ProTap cutting oil.) Drill out the holes, then use put the tap into a Tap Wrench, 1/4″ – 1/2″, and tap the threads. Remember to twist clockwise one turn, then twit counterclockwise a 1/4 turn each twist so you clear the threads of the metal you are cutting out.
- Once thats done, you can reinstall the Amp’d Up bracket and your lower skid plate.
Cutting the Lower Air Valence
- This is the fun part. You need to cut sections of the lower air valence part of the bumper if you want to put your bumper back on your truck. There are a lot of ways to do this, but I tried to take off only the bare minimum needed in order to fit the winch and bracket in there.
- First I used a Dremel Multi-tool cutter to make the big cuts, then used a Dremel rotary tool to smooth out the edges. Draw your lines out before cutting.
- I had to make a cut where the clutch of the winch was hitting between the top of the bumper (the metal part) and the lower plastic valence with an angle grinder because it is steel. If you do similar make sure to cut at least 1/4 or more deep, I didn’t cut enough at first when the bumper was off and it turned into a pain later on when the clutch was getting stuck while opening.
- Take your time, and check your work often by putting the bumper into place and see how its looking. If you screw up to the point of no return you can replace the lower air valance for about $80 or so on eBay.
Extending the Control Module Wires
- If you are copying our install here, then you will have to extend the wires of the control module to install it in the engine bay. Open up the module and take a look at how the wiring is setup. Take photos and mark the cables before you remove them so you know which is which later!!
- First I measured out the cabling from the spot I decided to put the control module (on the passengers side) by actually running it down from there to the spot where the winch is. That meant weaving it though the engine bay and out the gap between the headlight and frame where it made the most sense to run the cables. Leave yourself several inches of slack, you can always tighten it up later on so measure more than you need and cut the cables long at this point.
- I cut the cables with a Klein Tools Cable Cutter which cuts right through the 25mm cable easily.
- Take off each rubber waterproofing grommet rings from the original cables, and install them on your new longer cables as you do each one, this way you can retain the waterproofing on the control module.
- Then measure out the amount of cable you need to strip, strip them using a cable stripper like this one from Jokari install the 4 AWG ring terminals, crimp them on, and melt some heat shrink over the terminals and wire.
- A word about crimping the ring terminals: i used a TEMCo Hydraulic Electrical Cable Lug/Terminal Crimper Kit which works great, but the bits that come with it were AWG sizes. So what i did was crimp 2x with the closest one that was in the kit – I’d crimp once, then released the pressure on the tool to open it slightly, then turned it 90 degrees and crimped again. That gave me a nice even crimp around the whole terminal. I had to do it this way because this kit didn’t come with metric sizes. Maybe you can come up with a better solution.
- Don’t forget the small ground wire that runs from the control module down to the winch as well.
- On the bottom plate of the module I installed some metal brackets from a transmission oil cooler kit by drilling some holes in the plastic plate and bolting them on. Then I used to brackets later on, which at one end I bent about 45 degrees, to install the module into the truck. Watch the video, it will explain that better.
- For the power cable running to the battery, I took 2 extra steps: I added an 500amp inline fuse and a battery isolation switch I got from Sherpa (info about both here). The fuse I mounted on the firewall and the iso switch on the drivers side of the engine bay. Make sure you mount that low enough that you can still close your hood!
- One hiccup with the Isolation switch, the terminals on the switch are not the same size as the terminals on the wires which come with the winch…I ordered these but the hole in the terminal was too small – so I drilled it out to fit. I’m sure theres a better solution there but I got lazy and it works so, there you go.
- Last thing I did was to put 1/2 inch Split Wire Loom Tubing Wire Conduit over all the cable so that it wouldn’t rub around and short out the wires. I used zip ties in a few places to seal the ends of the loom and attach the cabling together and to the truck to snug it in place and secure it all up.
- You might need to bolt on and attach all the cabling before you bolt the winch to the bracket depending on the winch you are using (in our case, the ground is on the bottom, that has to be installed first before securing the winch.)
Bolt the Winch to the Bracket
- Get some Blue Loctite and put it on the 4 bolts which hold down your winch. Don’t skip this part! Those bolts are downward facing and don’t have lock washers – you don’t want them vibrating off.
- Our bolts are 12.9 grade, so that required 75 nm of torque to secure them. Your’s might be different, check your documentation.
- Wire up your controller and test it out. If everything is working right, then bolt up the bumper and you’re done!
- Well almost. Make sure to store your winch rope under pressure. So go out somewhere and extend the rope out (not all the way, leave several loops of line on the winch, you’ll see the red warning rope) attach it to a tree (use tree protectors and a soft shackle) and the pull the truck in. This way when you go to use the winch the first time the rope wont slip and you’ll know that it’s already prepped correctly.
This article is a work in progress, will finish it up soon!